

Introduction:
In today’s automotive landscape, where personalization has become the norm, license plate frames serve a dual purpose. They protect essential vehicle identification while serving as a canvas for vehicle owners to showcase their personal style. However, with a plethora of options flooding the market, the quality of these frames varies wildly. A single oversight in material selection, installation design, or environmental compliance can lead to product failures, customer dissatisfaction, and ultimately, damage to your brand’s reputation. As industry experts deeply rooted in mechanical metal and plastic manufacturing, we understand that a robust quality inspection standard isn’t just a checklist—it’s the cornerstone of a successful brand. This comprehensive guide will walk you through every critical aspect of license plate frame quality control, ensuring your products meet the highest standards.
1. Visual Inspection: The First Impression Counts
1.1 Overall Appearance
The surface finish of a license plate frame is often the first thing customers notice. A high-quality frame should exhibit a smooth, blemish-free surface, free from scratches, dents, bubbles, or any deformities that could detract from its aesthetic appeal. Conduct a visual assessment under natural light from a distance of 50 cm; any visible imperfections can significantly impact the perceived value of your product.
Color consistency is equally crucial. Variations in hue or shade between frames, especially within the same batch, can signal inconsistent manufacturing processes. When comparing different batches, ensure that no noticeable color discrepancies are visible to the naked eye under natural lighting conditions. This attention to detail not only enhances the product’s visual appeal but also reflects positively on your brand’s commitment to quality.
1.2 Edge Treatment
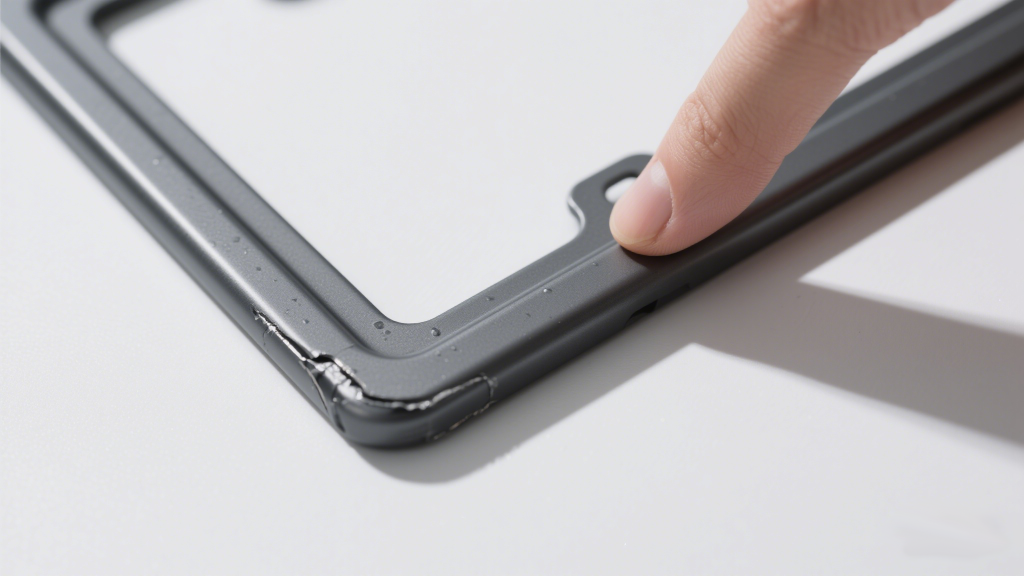
Sharp edges on a license plate frame pose a safety risk during installation and handling. All frames should undergo meticulous chamfering or sanding processes to eliminate any rough or jagged edges. A simple tactile test—running your finger along the edge—should reveal a smooth, rounded surface without any sharp protrusions.
From a visual perspective, the edges should form a continuous, uniform line when viewed from the side. Any signs of curling, cracking, or unevenness indicate a flaw in the manufacturing process that needs immediate attention. Proper edge treatment not only ensures user safety but also contributes to the frame’s overall durability.
1.3 Branding and Printing
For brand visibility and product identification, any logos, model numbers, or other printed elements on the frame must be clear, legible, and resistant to wear. Perform a simple durability test by wiping the printed area with a damp cloth for one minute. If the text or graphics smudge, fade, or become blurred, it indicates a subpar printing process that could undermine your brand image over time.
For frames with decorative prints, ensure that these designs do not obstruct or interfere with the readability of the license plate numbers. The printing quality should remain consistent across different lighting conditions, from bright sunlight to low-light environments. High-resolution graphics and fade-resistant inks are essential for maintaining the frame’s aesthetic appeal and regulatory compliance.
2. Dimension Inspection: Precision for Functionality
2.1 Overall Dimensions
The outer dimensions of a license plate frame play a crucial role in its compatibility with different vehicle models and regulatory requirements. The frame should not exceed the license plate size by more than 10 cm in width and 20 cm in height. Use a precision ruler or caliper with an accuracy of 0.1 cm to measure the frame’s maximum width and height, ensuring compliance with these specifications.
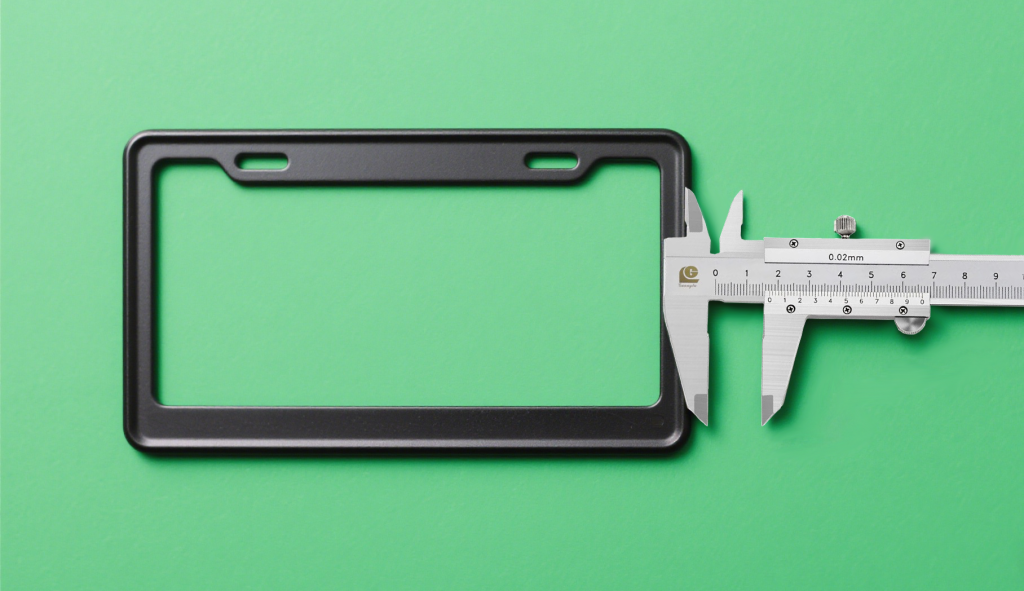
Internally, the frame must fit standard license plates snugly. For example, for the common US – sized license plates (30.48 cm x 15.24 cm), the inner dimensions of the frame should measure between 30.5 – 30.7 cm in width and 15.3 – 15.5 cm in height. These precise measurements, taken with a measuring tool accurate to 0.1 mm, ensure a secure and seamless fit, preventing the license plate from rattling or shifting during use.
2.2 Character Clearance
To avoid legal issues and ensure proper identification, a minimum clearance of 5 mm must be maintained between the frame’s inner edge and the license plate characters. Use a 0.1 mm feeler gauge to measure this distance at multiple points around the plate’s text. Consistent measurements across all points are essential to prevent any obstruction of the license plate numbers, which could lead to fines or safety risks.
2.3 Mounting Clearances
Proper mounting clearances are critical for both the functionality and safety of the license plate frame. When installed, the frame should be positioned at a height of 350 – 1320 mm above the ground and maintain a minimum clearance of 110 mm from the vehicle body. Use a precision rangefinder with an accuracy of 1 cm to measure these distances accurately. Incorrect mounting clearances can not only affect the frame’s stability but also pose a risk of damage to the vehicle or the plate itself.
3. Material Inspection: Strength Meets Durability
3.1 Material Selection
The choice of material significantly impacts a license plate frame’s performance, durability, and environmental footprint. Commonly used materials include aluminum alloy, stainless steel, ABS plastic, and PC plastic. Each material has its unique properties:
- Aluminum Alloy: With a density of around 2.7 g/cm³, aluminum alloy provides a favorable strength – to – weight ratio. Its tensile strength typically ranges from 180 – 350 MPa, ensuring good resistance to deformation. It naturally forms a corrosion – resistant oxide layer, and with anodizing, its durability in various environments is enhanced.
- Stainless Steel: Having a density of approximately 7.93 g/cm³, stainless steel offers high tensile strength, usually between 515 – 795 MPa. Its chromium – rich composition gives it excellent corrosion resistance, and it can withstand over 500 hours in salt spray tests. It also shows good heat resistance properties.
- ABS Plastic: With a density range of 1.02 – 1.05 g/cm³, ABS plastic offers a good balance of strength, impact resistance, and affordability. It is widely used for its ease of molding and ability to withstand moderate environmental conditions.
- PC Plastic: Slightly denser at 1.18 – 1.20 g/cm³, PC plastic provides superior impact resistance, heat resistance, and transparency. It is often preferred for applications requiring higher durability and optical clarity.

Use a density meter to verify the material density, ensuring that it falls within the specified range for each material type. This not only confirms the material’s authenticity but also its suitability for the intended application.
3.2 Material Performance
3.2.1 Metal Materials
Aluminum alloy and stainless steel frames must demonstrate sufficient strength and toughness to withstand real-world impacts. Conduct a simulated impact test by dropping a 1 kg steel ball from a height of 50 cm onto the frame’s surface. The frame should remain intact without any cracks, and the deformation at the impact site should not exceed 5 mm. This test simulates the kind of impacts the frame might encounter during vehicle operation, ensuring its durability and safety.
3.2.2 Plastic Materials
For plastic frames, tensile and flexural strength are key indicators of performance. ABS plastic should have a minimum tensile strength of 40 MPa and a flexural strength of 70 MPa, while PC plastic should exhibit a tensile strength of at least 60 MPa and a flexural strength of 90 MPa. These values are measured using a universal materials testing machine, following standardized testing procedures.
In addition to strength, plastic frames must also withstand a wide range of temperatures. Exposure to extreme cold (-20℃) and heat (60℃) should not cause brittleness, warping, or deformation. This ensures that the frame remains functional and retains its structural integrity in various climatic conditions.
3.2.3 Corrosion Resistance
All license plate frames, regardless of material, must exhibit excellent corrosion resistance. Metal frames undergo salt spray testing, where they are exposed to a 5% sodium chloride solution at a temperature of 35±2℃ for 48 hours. After the test, inspect the frame under a 5 – 10x magnifying glass for any signs of rust or corrosion.
Plastic frames are tested for chemical resistance using substances like alcohol and gasoline. Wipe the frame’s surface with these chemicals and observe for any signs of discoloration, swelling, or degradation. A frame that passes these tests ensures long-term durability and reliability, even in harsh environmental conditions.
4. Installation Performance Inspection: Secure and Hassle-Free

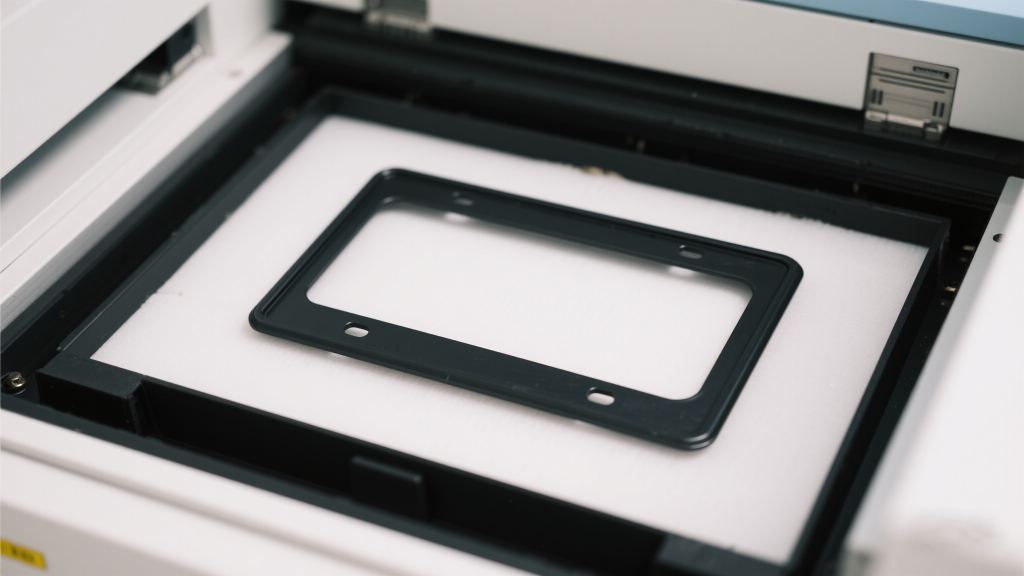
4.1 Mounting Hole Alignment
Precise alignment of the mounting holes is essential for a seamless installation process. The holes on the license plate frame should perfectly match the mounting points on the vehicle’s license plate holder. Test the alignment by installing the frame on a standard test vehicle using the provided mounting screws. The screws should thread in smoothly without the need for any additional modifications, such as drilling or reaming.
The diameter of the mounting holes should be compatible with standard license plate screws, typically around 6 mm with a tolerance of ±0.5 mm. Use an internal micrometer with 0.1 mm precision to measure the hole diameter, ensuring that it falls within the specified range for a secure fit.
4.2 Mounting Stability
Once installed, the license plate frame must remain securely attached under various conditions. Perform a pull test by applying a horizontal force of 200 N and a vertical force of 100 N to the frame for one minute. The frame should not loosen, detach, or sustain any damage during this test. Use a tensile testing machine to apply and measure the forces accurately.
To simulate real-world driving conditions, conduct a road test. Mount the frame on a vehicle and drive it for 50 km over a variety of terrains, including bumpy roads and speed bumps. After the test, inspect the frame and license plate for any signs of displacement or looseness. A stable installation not only ensures the frame’s longevity but also maintains the visibility and integrity of the license plate.
5. Reflective Performance Inspection (if applicable)
In regions where reflective license plate frames are required for enhanced visibility, strict standards apply. The reflective areas on the frame should cover at least a 1 cm wide continuous strip along all four edges. Use a precision measuring tool with 0.1 cm accuracy to verify the width of the reflective strip.
To measure the reflective intensity, use a specialized reflectometer. Position the instrument 10 m away from the frame and measure the reflective output at a specified angle. The measured value should meet or exceed the local regulatory requirements, typically expressed in candela per lux per square meter (cd/lx/㎡). This ensures that the frame provides adequate visibility, especially in low-light conditions, enhancing road safety.
6. UV Resistance Testing: Preserving Aesthetics and Performance
Prolonged exposure to sunlight can cause significant degradation to license plate frames, especially those made of plastic. To simulate this exposure, subject the frames to a xenon arc lamp chamber. Set the chamber conditions to an irradiance of 550±50 W/㎡, a wavelength range of 300 – 400 nm, a black – panel temperature of 65±3℃, and a relative humidity of 65±5%. Run the test for 168 hours, equivalent to approximately two weeks of continuous sunlight exposure.
After the test, evaluate the frame for three key aspects:
- Color Change: Measure the color difference (ΔE) using a colorimeter. A ΔE value of 3 or less indicates an acceptable level of color fading. Higher values suggest significant color degradation, which can affect the frame’s aesthetic appeal.
- Surface Condition: Inspect the frame’s surface for signs of chalking, cracking, or peeling. Any visible surface damage indicates poor UV resistance and potential structural weakness.
- Material Performance: For metal frames, measure the tensile strength after the test; the decrease in strength should not exceed 15% of the original value. For plastic frames, conduct an impact test, and the reduction in impact strength should be no more than 20% of the initial value.
7. Salt Spray Testing: Assessing Corrosion Resistance
Salt spray testing is a rigorous method for evaluating the corrosion resistance of metal license plate frames. In this test, the frames are exposed to a continuous mist of 5% sodium chloride solution at a controlled temperature of 35±2℃. The salt spray deposition rate is maintained at 1 – 2 ml/80cm²·h for a duration of 48 hours.

After the test, examine the frame under a magnifying glass for any signs of rust or corrosion. Even minor rust spots can indicate a failure in the corrosion protection measures, which can compromise the frame’s structural integrity and aesthetic appeal over time. Passing this test is essential for ensuring the frame’s durability, especially in coastal regions or areas with high road salt usage during winter.
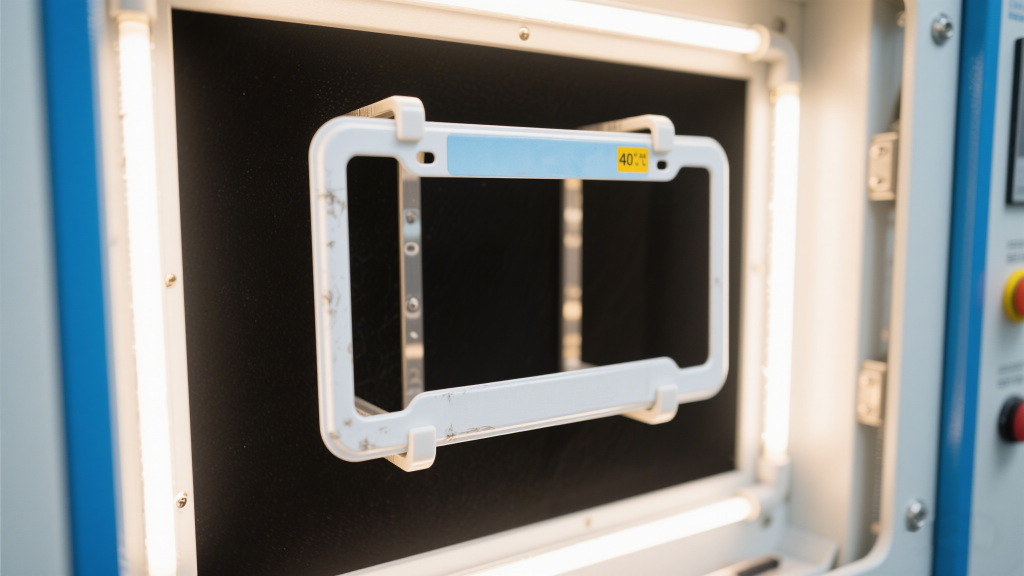
8. Thermal Cycling Testing: Withstanding Extreme Temperatures
License plate frames must endure a wide range of temperatures, from the freezing cold of winter to the sweltering heat of summer. Thermal cycling testing simulates these extreme conditions by subjecting the frames to repeated cycles of high and low temperatures.
The test involves three cycles, each consisting of:
- 24 hours at -40℃
- A 2-hour transition period
- 24 hours at 80℃
After the final cycle, inspect the frame for any signs of damage, including cracks, warping, or color changes. Measure the dimensions of the mounting holes using a 0.1 mm precision caliper; any change in size should be within ±0.2 mm to ensure continued compatibility with the vehicle’s mounting system.
For frames with reflective coatings or components, measure the reflective intensity again. The decrease in reflective performance should not exceed 10% of the original value. For plastic frames, retest the tensile and flexural strength; the reduction in strength should be limited to 15% of the initial values.
9. Vibration Testing: Enduring the Rigors of the Road
Vehicle movement generates constant vibrations that can loosen or damage license plate frames over time. Vibration testing simulates these real-world conditions by subjecting the mounted frame to sinusoidal vibrations.
Set the vibration test parameters as follows:
- Frequency range: 5 – 500 Hz
- Acceleration: 10 m/s²
- Duration: 2 hours per axis (X, Y, and Z)
After the test, check the tightness of the mounting screws using a torque wrench. The torque loss should not exceed 15% of the initial torque value. Inspect the frame for any cracks, deformations, or loose components. Pay special attention to any decorative elements or coatings, which should remain intact without any signs of peeling or detachment. For plastic frames, ensure that there are no signs of brittle fractures or localized weakening.
10. Adhesion Testing: Ensuring Long – Lasting Finishes
For license plate frames with painted or coated surfaces, adhesion testing is crucial to ensure the longevity of the finish. The cross-hatch test is a commonly used method for evaluating adhesion.
Using a cross-hatch cutter, create a grid of 10×10 squares, each measuring 1mm×1mm, on the coated surface. The cuts should penetrate through the coating to the base material. Apply a strip of 3M 600 tape firmly over the grid and then peel it off rapidly at a 180-degree angle. Repeat this process three times.
After the test, evaluate the percentage of coating that has been removed. An acceptable result is when the area of the removed coating does not exceed 5% of the total grid area. Higher percentages indicate poor adhesion, which can lead to peeling, chipping, or fading of the finish, negatively impacting the frame’s appearance and brand image.
11. Sustainability and Environmental Standards
11.1 Hazardous Substance Testing
In an era of increasing environmental awareness, ensuring that license plate frames are free from hazardous substances is not only a regulatory requirement but also a moral obligation. Conduct comprehensive testing for substances such as lead (Pb), mercury (Hg), cadmium (Cd), hexavalent chromium (Cr6+), polybrominated biphenyls (PBB), and polybrominated diphenyl ethers (PBDE).
Start with a non-destructive screening using X-ray fluorescence spectroscopy (XRF) to quickly identify the presence of these substances. If any suspicious readings are detected, perform confirmatory tests using more precise methods:
- ICP – MS: For accurate quantification of metals like lead, mercury, cadmium, and hexavalent chromium, use inductively coupled plasma mass spectrometry. This method involves acid digestion of the sample followed by detailed elemental analysis.
- GC – MS: To detect organic pollutants such as PBB and PBDE, employ gas chromatography – mass spectrometry. This technique separates and identifies the organic compounds after extraction from the sample.
The acceptable limits for these substances are as follows:
- Cadmium (Cd): ≤100 mg/kg
- Lead (Pb), Mercury (Hg), Hexavalent chromium (Cr6+), PBB, and PBDE: ≤1000 mg/kg
Compliance with these limits, in line with regulations such as the EU’s RoHS directive and REACH, ensures that your products are safe for both consumers and the environment.
11.2 Recyclability Testing
Promoting sustainability also involves ensuring that your license plate frames are recyclable at the end of their life cycle. Verify the recyclability of plastic materials through the following steps:
- Certification Verification: Check for third-party certifications, such as those from the Society of the Plastics Industry (SPI) in the US or equivalent European standards bodies. These certifications confirm that the material meets specific recyclability criteria.
- Melt Flow Index (MFI) Testing: Use a melt flow indexer to measure the flow properties of the plastic material under specified temperature and load conditions. A suitable MFI value indicates that the material can be reprocessed efficiently during recycling.
- Local Recycling List Check: Consult local waste management authorities or recycling facilities to confirm that the specific plastic material used in your frames is accepted for recycling in the target markets.
A recyclable frame not only reduces environmental impact but also enhances your brand’s reputation as an environmentally responsible manufacturer.
12. Electrostatic Performance Testing
12.1 Electrostatic Accumulation Test
- Test Method: Place the license plate frame sample made of plastic material in a constant – temperature and constant – humidity test chamber. Set the environmental conditions to a relative humidity of (30±5)% and a temperature of (23±2)°C. Let the sample stand for 24 hours to reach an environmental equilibrium state. Use an electrostatic tester to evenly select 5 different test points on the sample surface. At each test point, use a dry cotton cloth to quickly rub the sample surface 10 times with a constant pressure and speed. Immediately measure the electrostatic voltage value at that point within 1 second after rubbing. Repeat the measurement 3 times at each test point and take the average value as the electrostatic voltage result for that point.
- Acceptance Criteria: The average electrostatic voltage of the 5 test points of the license plate frame sample shall not exceed 5 kV. If the value is exceeded, it indicates that the license plate frame is prone to excessive electrostatic accumulation in a dry environment, posing a risk of electrostatic discharge. In this case, the sample is judged as unqualified, and the material needs to be improved or an antistatic agent needs to be added to reduce electrostatic accumulation.
12.2 Electrostatic Discharge Capacity Test
- Test Method: Place the electrostatic – charged license plate frame sample on an insulated table, keeping it parallel to a metal plate (with a size no smaller than that of the license plate frame) simulating the vehicle body. The distance between them is 1 cm. Use an electrostatic decay tester to first measure the initial electrostatic voltage value of the license plate frame sample. Then, instantaneously bring the license plate frame into contact with the metal plate and start the tester to record the time required for the electrostatic voltage to decay from the initial value to 10% of the initial value. Repeat the test 3 times for each sample and take the average value as the electrostatic decay time result.
- Acceptance Criteria: The electrostatic voltage decay time of the license plate frame sample shall not exceed 1 second. If the decay time is too long, it means that the license plate frame has insufficient electrostatic discharge capacity, and electrostatic discharge may occur when it comes into contact with the vehicle body, potentially damaging the license plate frame or other components. In this case, the sample is judged as unqualified, and the design needs to be optimized or a material with better electrostatic discharge performance needs to be used.
13. License Plate Frame Disassembly Test
1. Test Method
- Regular Disassembly Test: Use standard license plate frame installation tools to perform the disassembly operation 24 hours after installing the license plate frame. Simulate the normal disassembly process, loosen the installation screws according to the specified torque, and record the time required for the disassembly process and the operation difficulty.
- Disassembly Test after Simulating Harsh Environments: After subjecting the test sample with the installed license plate frame to a high – low temperature resistance test (3 cycles), a salt spray test (48 hours), and a vibration resistance test (2 hours in each of the X, Y, and Z directions) in sequence, use the standard tools again to perform the disassembly operation, and also record the time required for the disassembly process and the operation difficulty.
- Damage Inspection: Before and after disassembly, use a high – definition camera to photograph the license plate and the corresponding installation part of the vehicle body respectively. Focus on checking whether there are scratches or deformations on the license plate surface, and whether there are abrasions or scratches on the paint surface of the vehicle body installation part. At the same time, use a micrometer with an accuracy of 0.01 mm to measure the dimensional changes of the license plate edge and the edge of the vehicle body installation hole.
2. Acceptance Criteria
- Disassembly Time and Difficulty: During the regular disassembly process, a single person using standard tools should be able to complete the disassembly within 3 minutes. There is no need to use excessive force or non – standard tools during the disassembly process. The operation difficulty should meet the ergonomic requirements, and there should be no obvious jams or screw stripping phenomena. After simulating harsh environments, the disassembly time shall not exceed 5 minutes, the operation difficulty shall not increase significantly, the screws can still be loosened normally, and there shall be no adhesion or jamming between the license plate frame and the license plate or the vehicle body.
- Damage Condition: Before and after disassembly, there should be no visible scratches or deformations on the license plate surface. The license plate number and relevant markings should be clear and complete, without blurring or color fading caused by disassembly. The paint surface of the vehicle body installation part should remain intact, without abrasions or scratches. The dimensional change of the installation hole edge should be within ±0.05 mm to ensure that it does not affect subsequent reinstallation.
Conclusion
In the competitive world of automotive accessories, quality inspection is not just a necessity—it is a defining factor in building a reputable brand. By following stringent quality standards, manufacturers can ensure their license plate frames are durable, aesthetically pleasing, and safe for consumer use. This quality control process is crucial for the brand’s success, as any lapse can damage both the product and consumer trust. With the insights shared in this guide, manufacturers can confidently craft products that meet the highest industry standards and, ultimately, solidify their place in the market.
